When you’re creating a comic book, your artwork isn’t finished when the last panel is inked or colored — it’s finished when it’s printed beautifully on the page. One of the biggest pitfalls for first-time comic creators is misunderstanding bleeds and margins. These aren’t just printer jargon; they’re crucial for ensuring your comic looks as professional in print as it does on your screen.
Let’s break down what they mean, why they matter, and how to set them up properly.
What Are Bleeds?
A bleed is the area of your artwork that extends beyond the final trim size of your comic. In printing, pages are printed on larger sheets and then trimmed down to size. If your artwork stops right at the edge of the trim, even a slight cutting misalignment could leave an unwanted white edge.
The Rule of Thumb
Add at least 1/8 inch (0.125″) or 3 mm of bleed on all sides of your page.
For example, if your comic’s final trim size is 6.625” × 10.25”:
- Final page size (trim): 6.625” × 10.25”
- With bleed added: 6.875” × 10.5”
Anything that touches the edge of the page — background art, full-page illustrations, color fills — should extend into the bleed area. Learn more about setting up bleeds and margins here.
Safe Margins (a.k.a. the “Safety Zone”)
While bleeds protect your edges, margins protect your content. The margin is the inner border of your live area — the space inside which all important content (like dialogue, captions, and key artwork) should stay safely away from the trim line.
Recommended Margins
Keep all important content at least 0.375” away from the trim edge. For perfect binding, a 0.375” to 0.5” (0.5 for comic drawing) margin on the inner edge (gutter edge) in recommended. If you’re creating a double-page spread,, make sure nothing important crosses the gutter (the inner spine area), where parts of your art may be lost in the binding.
Why is this Important for Comic Book Printing?
Comic books typically have intricate, hand-drawn illustrations that extend all the way to the cut edge. In the event that you need to resize your artwork to account for bleed and safety margins, the fix will not be as simple as extending a solid color background; you might end up having to re-illustrate the entire page! That is why it is important to design your comic with extra bleed and margin area in mind. This way, your printed product will turn our exactly how you intend.
Putting It Together: A Comic Page Layout Guide
Here’s a quick reference for standard comic book dimensions:

6.625″ x 10.25 Perfect Bound Guideline
If you’re working digitally, set up your document from the start with these dimensions
Import the guideline PDF to your Photoshop (or your preferred program) file, in 1:1 ratio to check. Make sure to remove the guidelines from your artwork before exporting to print ready PDF.
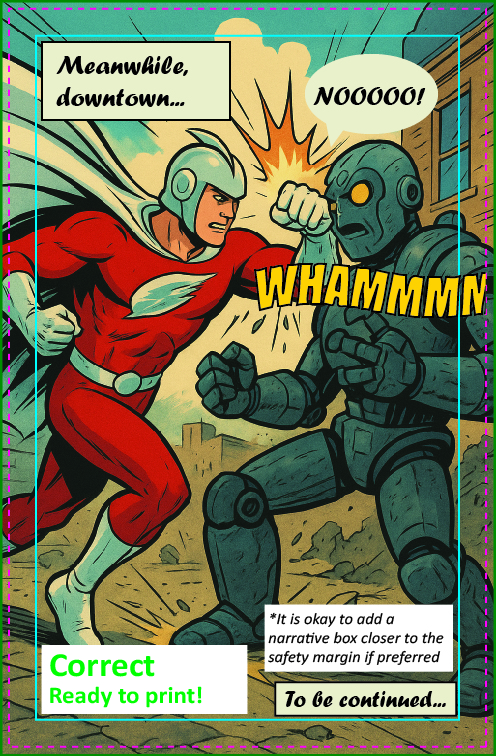
See the example below of incorrect file set-up and correct file set-up:
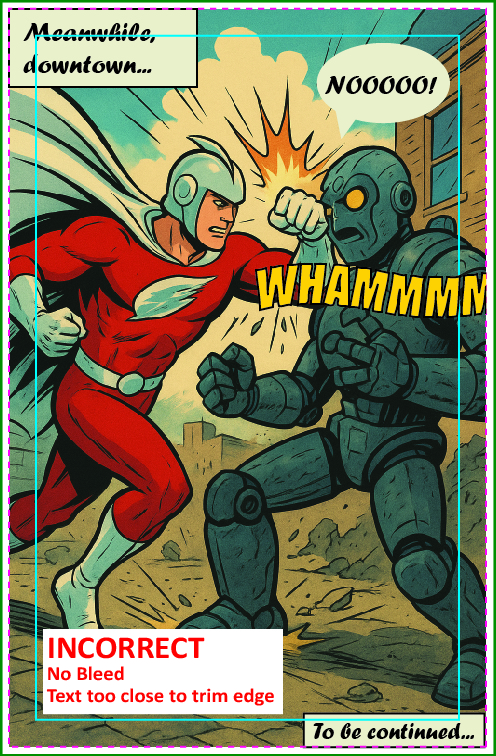
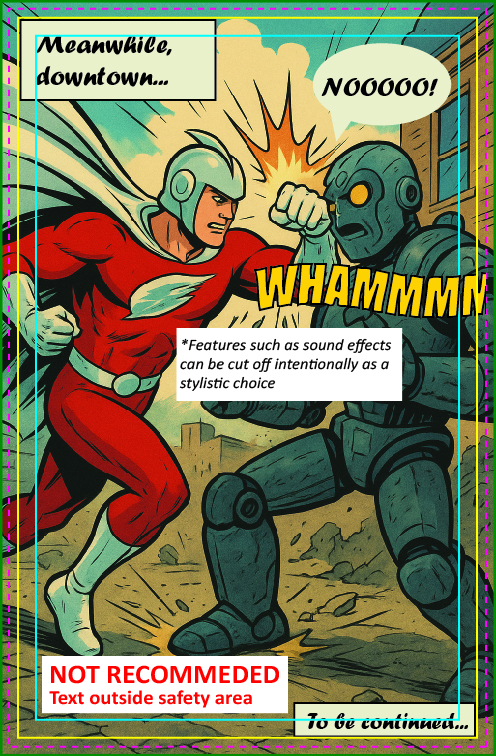
Borders
If your comic includes borders around the edge of the page, such as comic panels, we suggest positioning them at least 0.25” inside the trim line—twice the usual safe zone—to allow for the 1–2 mm trimming tolerance. The wider the borders are, the better!
Common Mistakes to Avoid
- Forgetting to add bleeds.
You can’t just stretch your artwork later — always build your bleeds into the file from the start. - Placing dialogue too close to the trim line.
Even a small shift in trimming can cut off your text bubbles. Keep speech and captions well within the safe area. - Ignoring the gutter on spreads.
Center art can vanish in the fold if you don’t allow for spine thickness.
Final Tips Before You Print
- Review our print specifications first!
- Always remember to keep a working layer file on hand so it is easier to adjust dialogue placement if required.
- Export as PDF/X-1a or PDF Print Ready. This ensures color and bleed settings are preserved.
- Double-check your pages at 100%. Zoom in and confirm your bleed and safety zones before submitting.
In Summary
Proper bleeds and margins are the difference between a professional-looking comic and one that looks “off” in print. They protect your art, maintain your story’s visual rhythm, and make sure your readers see your work exactly as intended.